![]() DLC related content
DLC related content
![]()
 This article contains spoilers.
The Triplicate Space is a hidden area behind the shipwreck (where Floofty took momentary residence) at Boiling Bay.
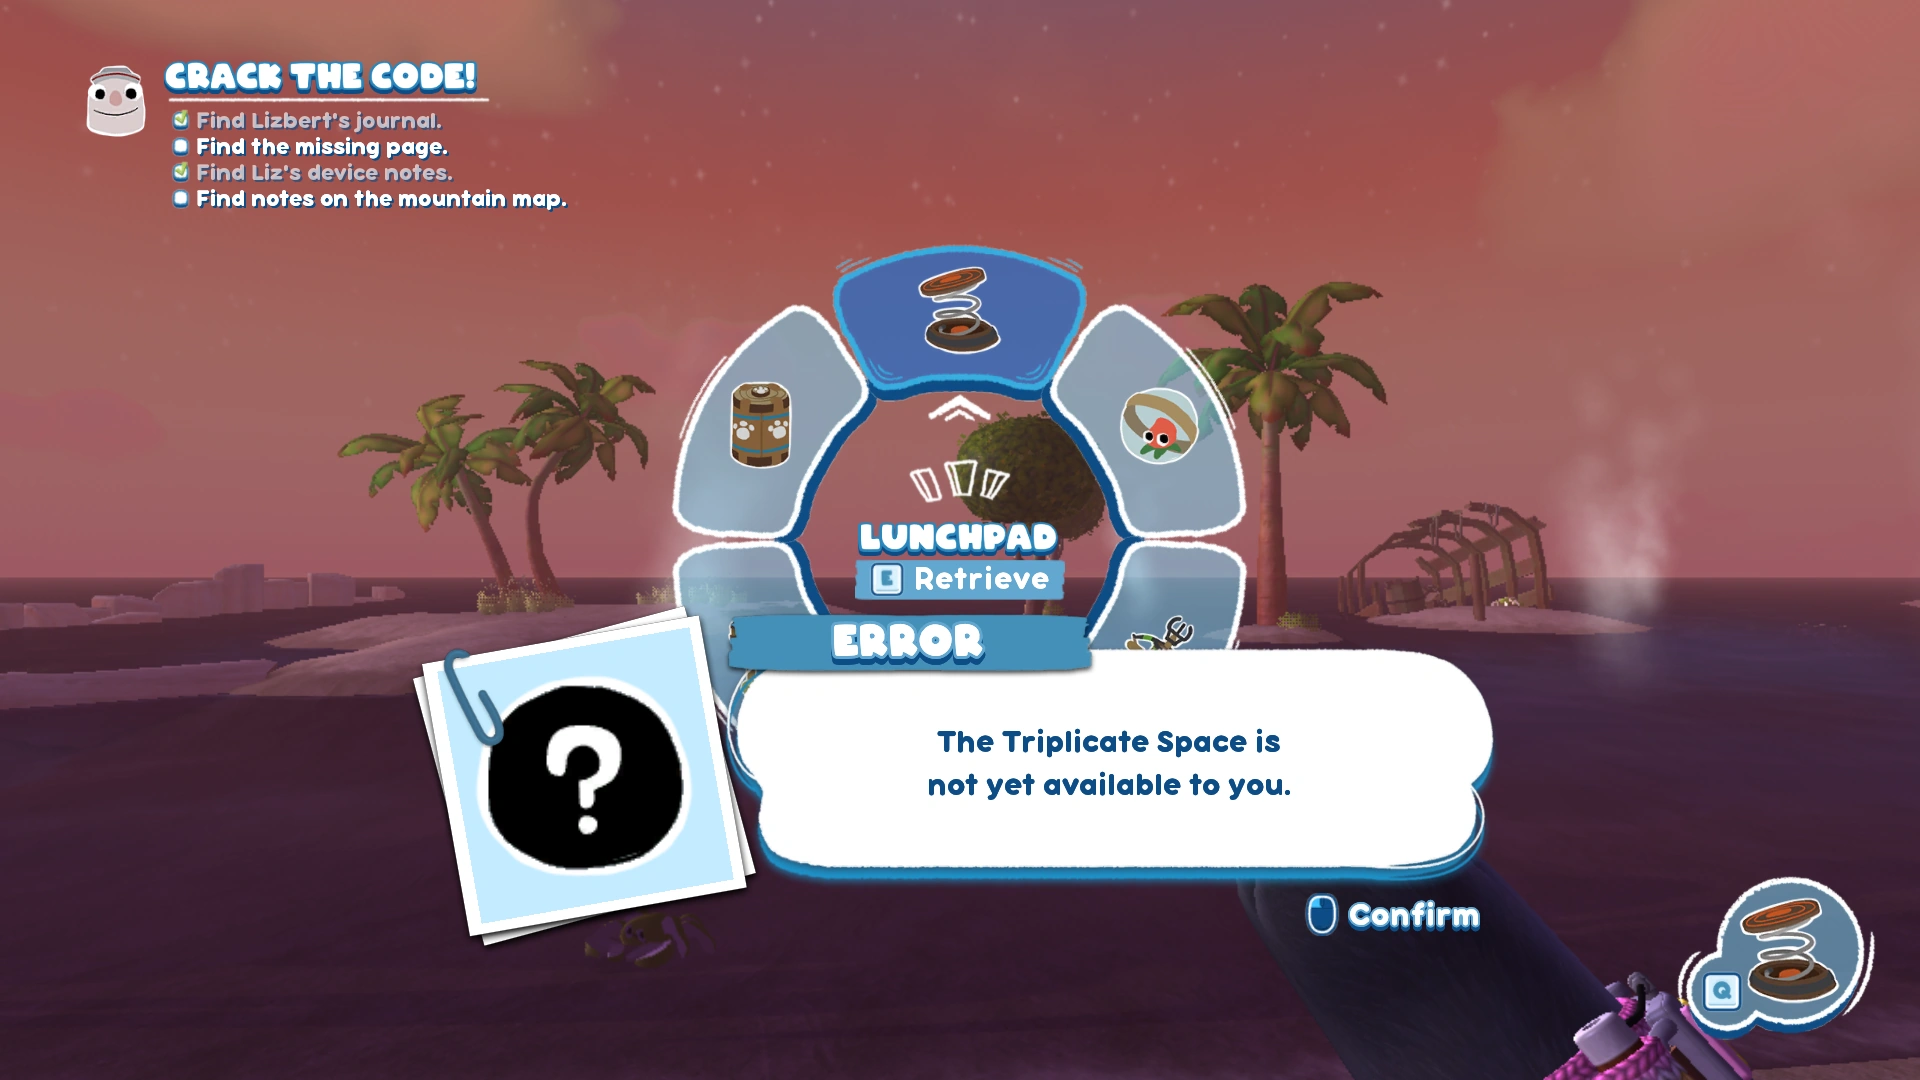
Originally, reaching the area would be followed by a respawn and an error message stating: "The Triplicate Space is not yet available to you".[1]
As of the Isle of Bigsnax DLC, the area has become accessible after having picked up the Triangle Key from Broken Tooth. After obtaining it, the Journalist receives a letter that suggests to seek out "Grumpbeard" - referencing the ship that belonged to Grumpbeard as established per Triffany's Side Quest - which has been completed at this point in the game.
Description[]
The Triplicate Space was some sort of temple built and used by ancient Grumpuses living on Snaktooth Island. It was the work of the Stone Grumps, given its numerous connections to Broken Tooth. The space is designed with a triangle motif, with all halls, doors, and most rooms being triangle-shaped. The two rooms contain statues of the horned Grumpus, which can be rotated to activate mechanisms.
Entrance and Center Room[]
After entering the area, the player is greeted by an old tape recorder, with the mystery Grumpus daring them to go in further for more knowledge regarding the area. The tape in the next room reveals the identity of this Grumpus to be Alegander Jamfoot, who was sent to Snaktooth Island to keep watch over the Triplicate Space in what he suspects is punishment.[2]
The Journalist has access to both the Observation Room (on the left) and the Pendulum Room (on the right) and can complete its tasks in either order. The recordings found are loose in content and do not directly follow up on one another.
Once completing a puzzle of one room and pressing the conclusive pedestal button, a mural reveals itself in the Center Room. The correlating mural faces the entrance of the room it activates, meaning that once exiting the room you will face this mural directly.
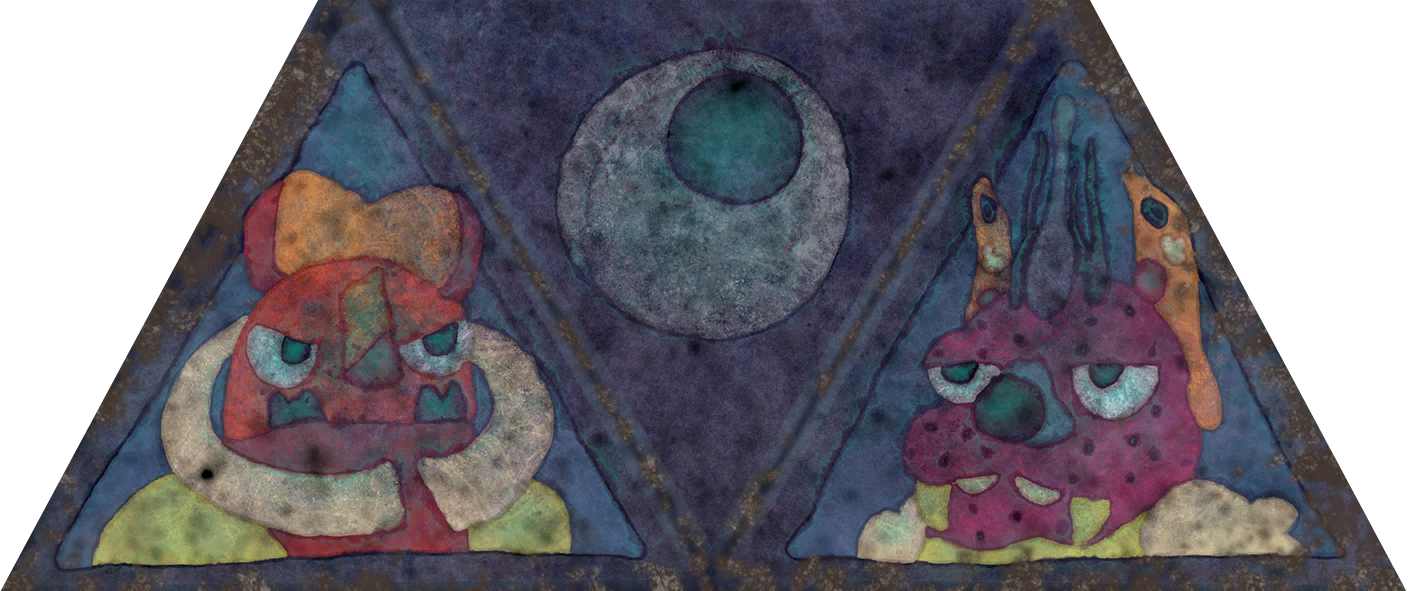
For the Obervation Room, where Jamfoot speaks of the Bugsnax Queens, a mural depicting said Queen is revealed.
The first "wrathful" queen has horns (and shoulders) of Deviled Eggler, the nose, teeth and crown of Cheddaboardle Rex and perhaps the torso of Tikkada Masala although it lacks the rice part on the chest.
The second "benevolent" queen has horns of Mothza Supreme, the nose and crown of Stewdler, teeth of Yellow Peelbug, shoulders of Poptick and the torso of Snaquiri.
The mural contains an empty space which would have contained an image of a third Queen.
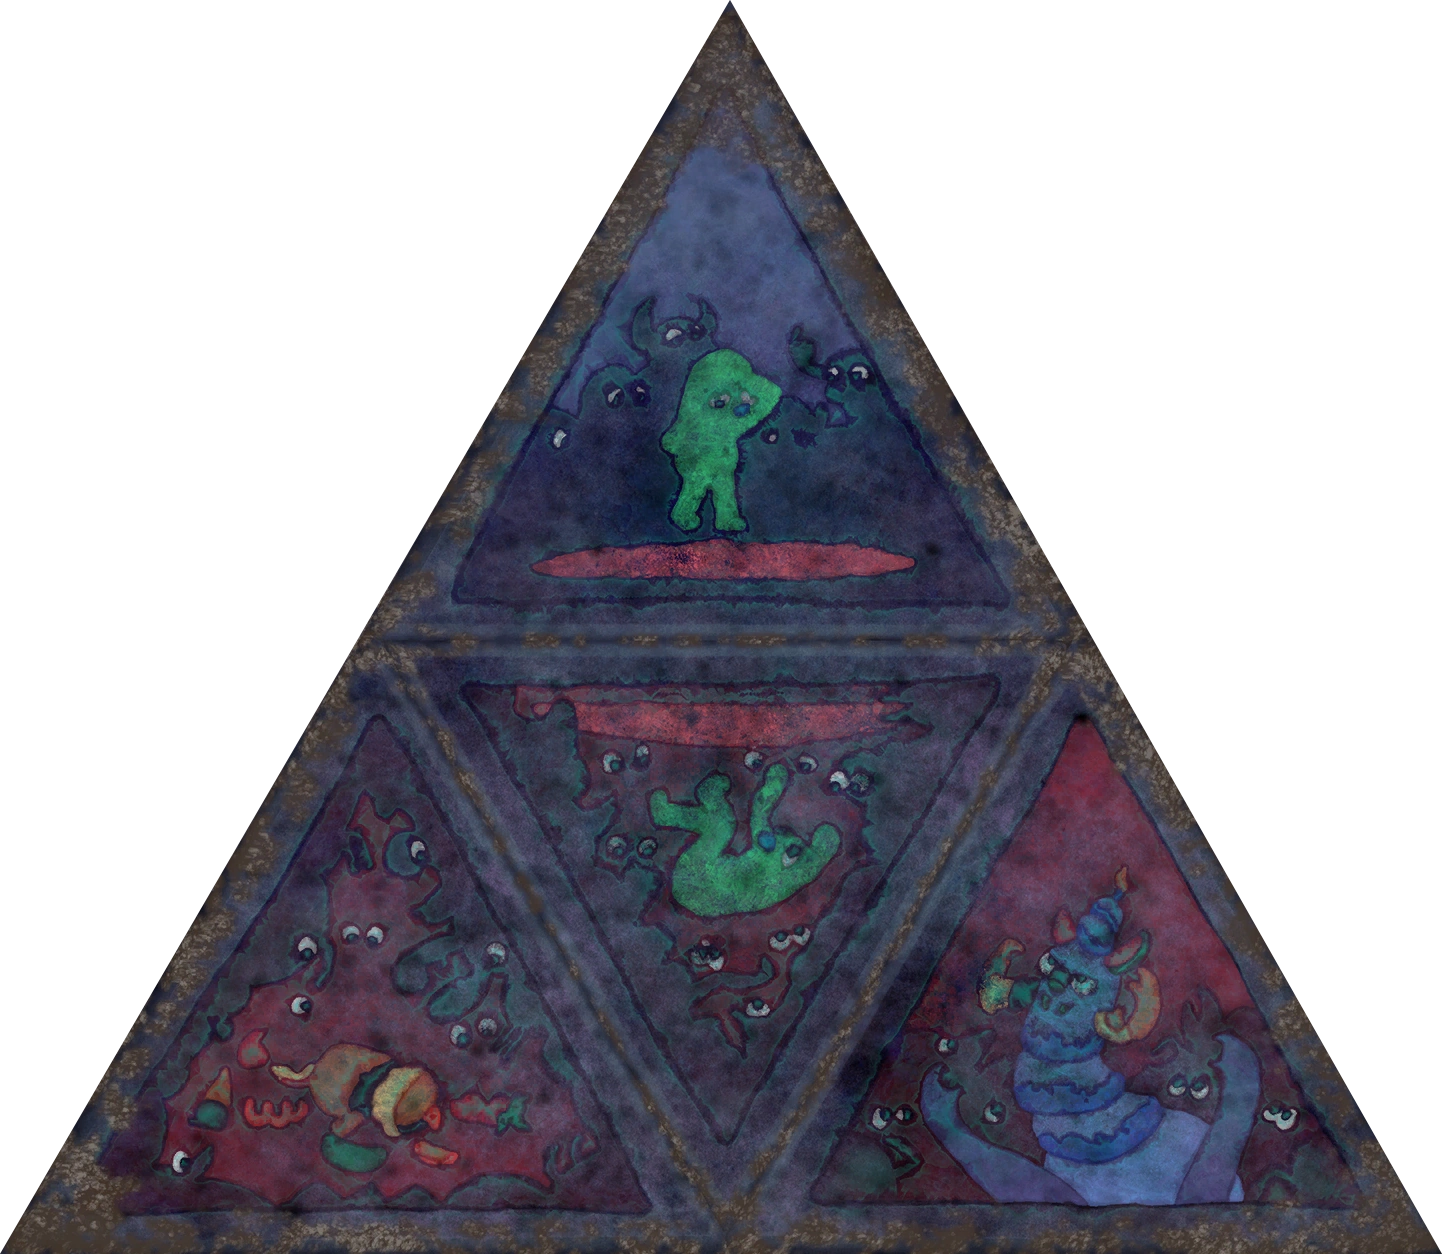
For the Pendulum Room the mural depicts a sacrificial scene with two outcomes; one of the sacrifice's demise (left) and one of the sacrifice's rise to become the next Queen (right). No explicit reference is made to the mural in the recordings found in this room, where Jamfoot mostly rants about the Snakolytes as an organisation. Jamfoot does make a reference to Bronica Lottablog whom they warn the "Journalist" not to follow. This may imply Bronica ventured the same path as Lizbert but has the other outcome. Coincidentally, the Grumpus depicted on the mural is a bright green alike Bronica's supposed fur color.
Observation Room[]
This large space holds fourteen Grumpus statues of the same design, seven to each side. Three tapes recorders can be found here; one near the entrance to the right, one on the platform with the reset button and one underneath the windows once opened, next to the newly revealed button. After making all the statues face the same directions, the mid sections triangular windows will fold open to the underwater, showing Megamaki swimming.
Jamfoot speaks of the mystery of the Temple structure itself and the history of the Bugsnax Queens. Jamfoot hopes to prosper within the organization with their research findings.
Once pressing the conclusive puzzle button, a mural reveals itself in the Center Room. The Obervation Room's mural depicts the two queens with the third queen slot still remaining open.
Pendulum Room[]
This large space holds three Grumpus statues of the same design, positioned in a triangle. These statues can be turned and do not affect one another. There is a door at the end of the room that will open if all three statues face it. The room itself is Jamfoot's living space and study that seems to be a library. The area is full of scroll and books, a flag of Grumpbeard hangs on the wall and signs of living such as a bed and stacked toiler paper. On the worktable lie many research- and thought notes as well as another tape, where Jamfoot laments their Library Science degree.
In the middle of the room hangs a great pendulum, hollow and diamond shaped, attached to the ceiling which open space through which the light of the full moon enters.[3] The pendulum is affected by a magnetic field that is triggered upon the moving the statues to face the pendulum. If all three statues face the pendulum, it will swing between the three statues. Through this action, The Journalist can venture forth.
Once pressing the conclusive puzzle button, a mural reveals itself in the Center Room. The Obervation Room's mural depicts a sacrifical scene held to create a Bugsnax Queen.
Break Room[]
After having completed the tasks and pressed the buttons in both rooms, the Journalist is able to access the third and final room. It is designed to look like an office' break room, hence the name. The walls are adorned with triangular pin boards where Jamfoot left notes for themself and employee of the month rewards commemorating Jamfoot's dedication, awarded by themself. (The pictures put up are the only imagery of Jamfoot shown in the game.) There is a triangle shaped watercooler with impractical triangle shaped cups.
In the middle of the room sits a triangular table with a cup of coffee - this coffee turns out to be Joey the Cappucceetle, a Bugsnak who Jamfoot considers a friend - and a tape recorder on a chair next to it. In this final tape recording, Jamfoot concludes the interview.
Tape Recordings/Mysterious Interview[]
Main article - Interview The Mysterious Voice!
Gallery[]
")
In Other Languages[]
| Language | Name |
| Espaço Triplicado | |
| El Espacio Triplicado | |
| El Espacio Triplicado | |
| La Triangulension | |
| Der Dreifache Raum | |
| Lo Spazio Triplicato | |
| Przestrzeń Trójkątyzująca | |
| Триагональное пространство | |
| 3중 공간 | |
| トリプルスペース | |
| 三角空间 |
References & Notes[]
- ↑ The original 'Triplicate Space unavailability' message features a black circle with question mark icon. Post-DLC, attempting to access the space without having obtained the key will trigger the same message, now featuring a triangular shape question mark icon.
- ↑ No further elaboration is given on why Jamfoot considers his installation a punishment or why such would be executed.
- ↑ It does not matter at what day or time you enter the Triplicate Space; it will always be night with a full moon.